OWASP Top 10 2025: How to Secure Your Code Part 2
In this series I’m going to go through the OWASP Top 10:2025 list with a snippet of vulnerable code relating to the vulnerability and show you how to secure it using Python.
Vulnerable Code
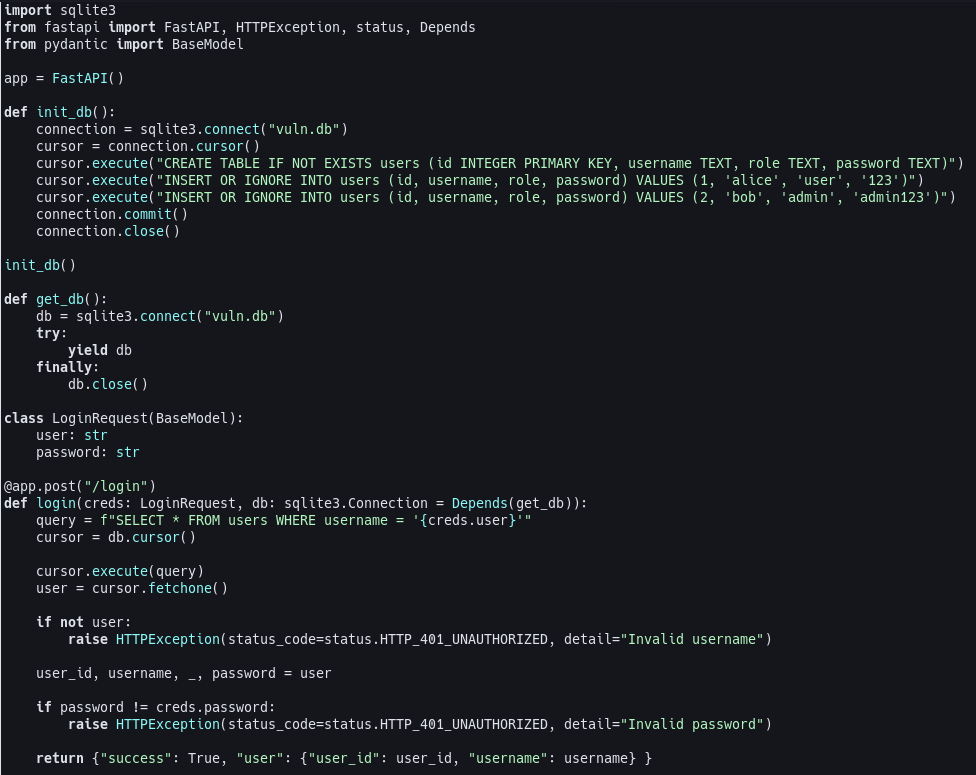
Below is a piece of vulnerable code which contains a Cryptographic Failure, Injection (in the form of an SQL Injection), and Insecure Design vulnerability as listed on the OWASP Top 10:2025.
Note
The original vulnerable code was NOT generated by AI.
Cryptographic Failure
Cryptographic failures are when applications don’t properly protect sensitive data using encryption or hashing. This means storing passwords as plain-text passwords or credit card numbers plainly on a database or system or using deprecated and weak algorithms (think SHA-1 or MD5) or custom cryptography to attempt to secure sensitive data. So if you look at our code I’m sure you can spot the vulnerability and cryptographic failure.
In our code we’re creating a database and putting plain-text passwords directly in the code and not hashing them in the database. If there was a bad actor attempting to extract information from our website they’d be able to get both users’ passwords and have complete access to their account. One way to ensure there is no cryptographic failure is to encrypt the password when the user registers for the website or application, this prevents the need for storing passwords in code or environment variables. For our application we’re not going to do this as we want these users already registered just for the sake of this article.
The first step is to remove the passwords from our code and extract them from environment variables. This allows us to submit/push this code to our Code Management System or Version Control Repository Hosting Service (think GitHub, GitLab, and the like) without having to worry about having plain-text passwords in our commit history or in beta/production code. The second step is to encrypt the password so that if information from our database leaks user passwords are not shown in plain-text and easily accessible. So we’ll use Python’s Argon2id which is the gold standard for encryption as of writing this article. Here is what our code looks like after these changes.
As stated above we’re going to pull our passwords from environment variables, for the sake of this article, and hash them using Python’s Argon2id library. I’ve decided to keep the extraction of the passwords from environment variables tied to the scope of this function as this is the only place we need to get the passwords from. This way Python’s garbage collection will cleanup once we’ve called this function as opposed to having these globally and keeping them around even after they’ve served their purpose. 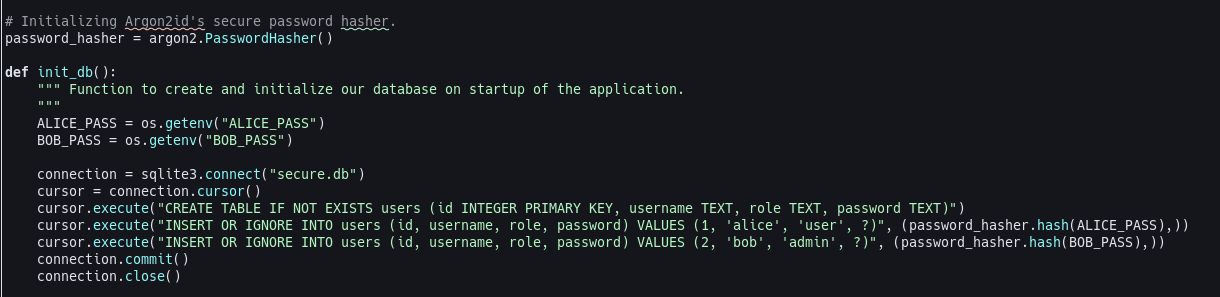
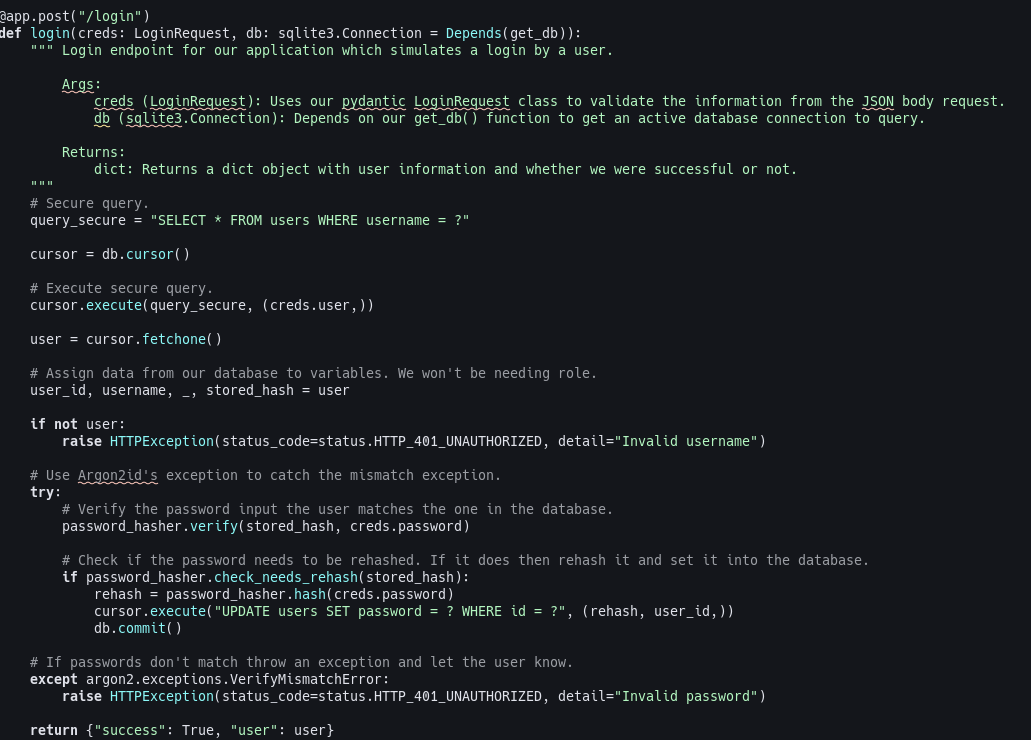
Next we need to check the user-supplied password against the hash and verify that it is correct, so we’ll use Argon2id to verify that and throw an error if it cannot verify the password. 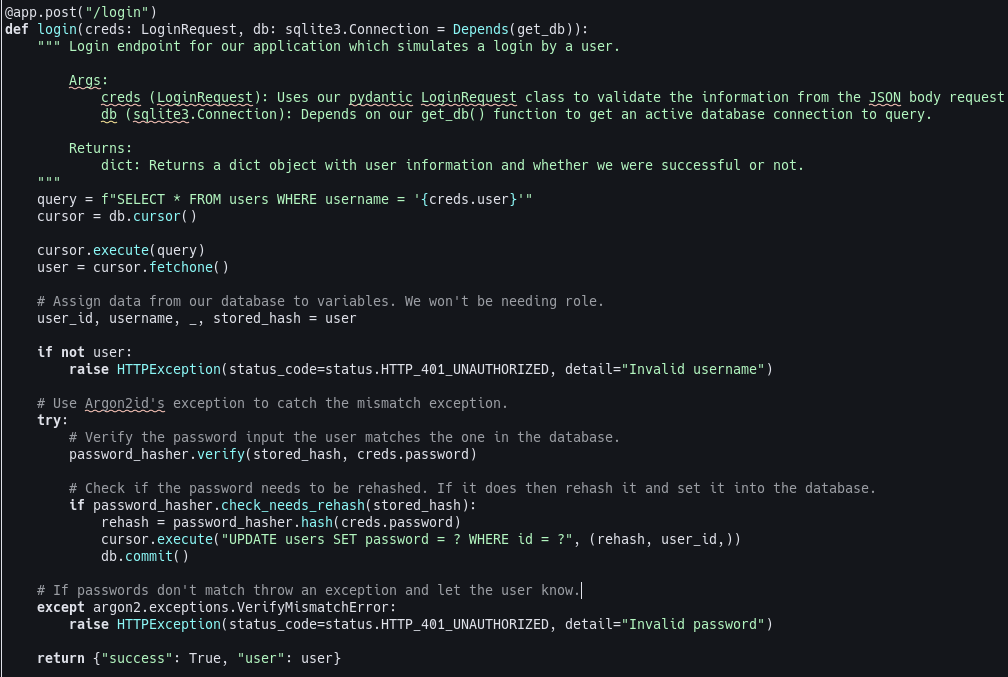
Injection (SQL Injection)
OWASP defines an injection as an “…application flaw that allows untrusted user input to be sent to an interpreter (e.g. a browser, database, the command line) and causes the interpreter to execute parts of that input as commands.”. This means that an application is vulnerable when user-supplied data or dynamic queries are not sanitized, filtered, or validated by the application. Injection includes Cross-site Scripting (XSS) and SQL Injection. In this example I’ll be showcasing an SQL Injection, can you spot it in the code?
Our code is using Python’s f-string to format our query which means it is susceptible to injection. Our query is currently f"SELECT * FROM users WHERE username = '{creds.user}'" and then the code just executes that query without any validation or sanitization. This means that a bad actor can login as an admin without requiring the password using SQL injection. Here’s what it looks like when we use SQL injection to login as the admin.
Disclaimer
This SQL injection is for educational purposes only. Do not go out and attempt this on applications you do not own or have explicit permission to do so. Any use of this SQL injection method is to be used responsibly and at your own risk. I assume no liability for misuse or damage caused by the unauthorized application of this information.
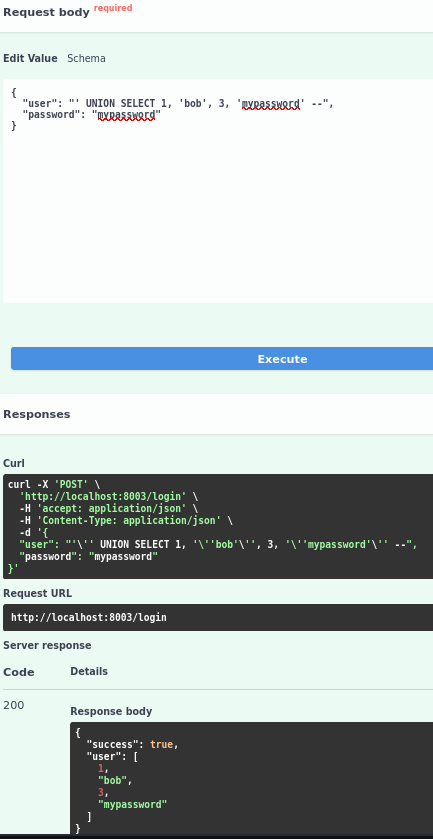
Here is what the SQL injection is doing:
': This is closing the query string we want to override.UNION: This is concatenating what came previously (nothing) to what is coming next.SELECT: Used to select data from a database, in this case select what comes next.1, 'bob', 3, 'mypassword': We know how many entries there are in our database and the order so we’re able to just recreate that. This is the data we’re creating in memory to be passed to the variable in our function.--: This represents the start of a single line comment. This means anything after – will be commented. Since we’re the bad actor in this case we don’t know if there is more to the query so we just comment anything else out just in case.
So what we’re doing here is telling SQL to generate a fake new row of data on the fly. This means when we call cursor.execute(query) it tells the database engine to create this row in memory and give us all the data back when we call cursor.fetchone(). The database remains unchanged and this synthetic information that was stored in memory is used in place of an entry from the database which allows us to login and impersonate an admin all because we did not sanitize or validate input into our database query.
To fix this issue we need to modify and secure our query to prevent bad actors from using SQL commands in the login field. To do this we need to use what is called a parameterized query. Here is our old query and our new query, inside our login endpoint, alongside each other so you can see the difference.
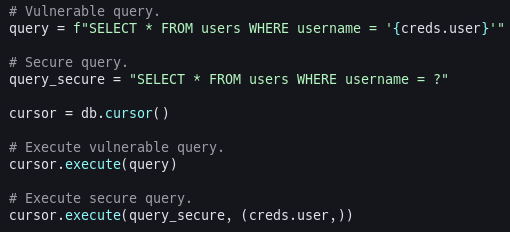
So we can remove our old unsanitized query and replace it with our parameterized query to prevent SQL injection. Here is what our login endpoint looks like now.
Insecure Design
Insecure design is a flaw in the applications design that allows for bad actors to take advantage of. It is the concept that an application or piece of software was not built with secure fundamentals in mind which means it differs from a coding bug because the flaw was present from the planning stage, and is still present if the application or software is coded perfectly. Common examples of insecure design are:
- Creating an e-commerce checkout which allows for negative pricing inputs or to bypass payment validation.
- Allowing a bad actor to brute-force login credentials by designing a login page without rate limiting.
- Designing simple recovery questions which can be easily phished or researched by bad actors.
One way to prevent this is by Threat Modeling. This means mapping out potential attack paths and security requirements before any code gets written. The second is to use secure design patterns this means using pre-built, tested, and secure frameworks for authentication and authorization such as FastAPI’s OAuth2 we used in part 1 of this article. Lastly, be up-to-date on recent attacks and how they were carried out so you don’t fall victim to attacks other applications have fallen victim to.
Can you spot the insecure design in our code? In our login endpoint we don’t have a rate-limiter coupled with the information disclosure of “wrong username” and “wrong password” errors will alert any bad actors that they could potentially brute-force login credentials to our application. With FastAPI we can implement a rate limiter fairly easily and add a more generic error message as to not give bad actors any hints. This is how we go about adding a rate limiter to our login endpoint.
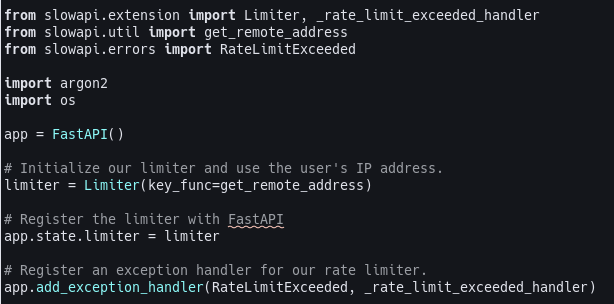
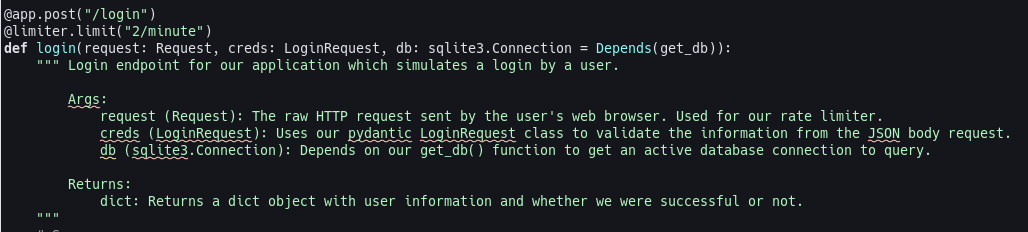
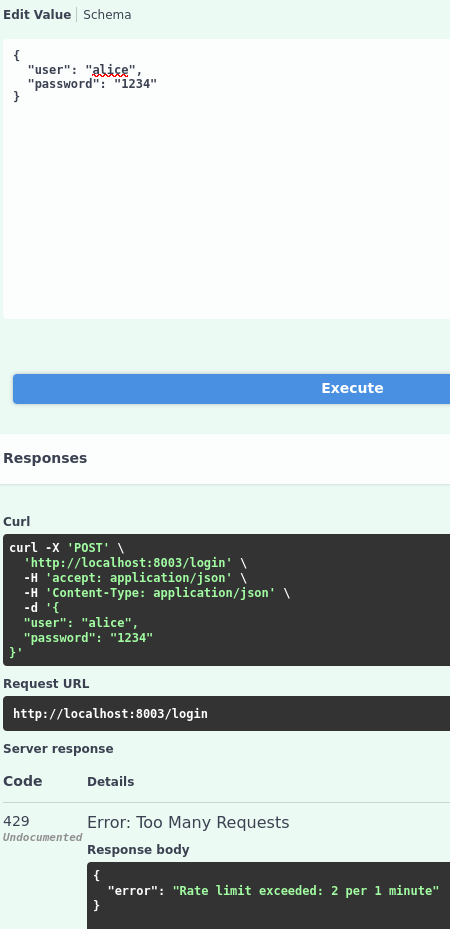
Here is our rate limiter in action.
This concludes the second part of the article on securing OWASP Top10:2025 security vulnerabilities. You can find the vulnerable and secure code versions on my github here.