MD5 Collision Pwnable.kr

I will be walking through the pwnable.kr CTF called “collision” which can be found here. When clicking on the CTF (second one from the left - same image as the one attached to the article) you’ll see it mentions “MD5 hash collision”. What is an MD5 hash and what does it mean by MD5 hash collision?
The Vulnerability And Why It Works
Before We Get The Flag
What Is An MD5 Hash
MD5 is part of the message-digest algorithm family and is still a widely used hash function. MD5 is an algorithm that produces a 128-bit hash function when used. MD5 is mostly used in tasks that do not require critical security checks, one example being file checksums. Previously MD5 was used widely as a cryptographic hash function but was found to contain vulnerabilities and was no longer suitable for cryptography tasks. One of those vulnerabilities, and the one focused on this task, is collision.
What Is A Collision Vulnerability?
A collision vulnerability in cryptography is when two different inputs produce the same output (the same hash). This allows attackers to replace legitimate data with malicious data such as forged signatures (this verifies the authenticity of files or documents).
col Vulnerability
Understanding The Code
Now that you’re familiar with MD5 hashes and collision vulnerabilities we can move onto working on this CTF. Following the instructions on the site we are going to ssh into the machine with the following command: ssh col@pwnable.kr -p2222 and once prompted provide the password provided by the CTF. Once in the machine we can run the ls command and see that we get 3 files back col col.c flag. If we try cat flag you’ll see that we get a Permission denied error.
Tip: It’s always good to do the obvious first, which in this case is
cat flag. Sometimes the task at hand is as easy as reading the flag so it never hurts to try the obvious first. Also good for testing any software/configuration to weed out any potential bugs.
So we cannot get the flag the old fashioned way, but what fun would that be if we could? So then we have col col.c left. col is the executable file compiled from the col.c file. So lets take a look at the col.c file and see what is going on in there. Here is my terminal, if you’ve been following along yours should look the same: 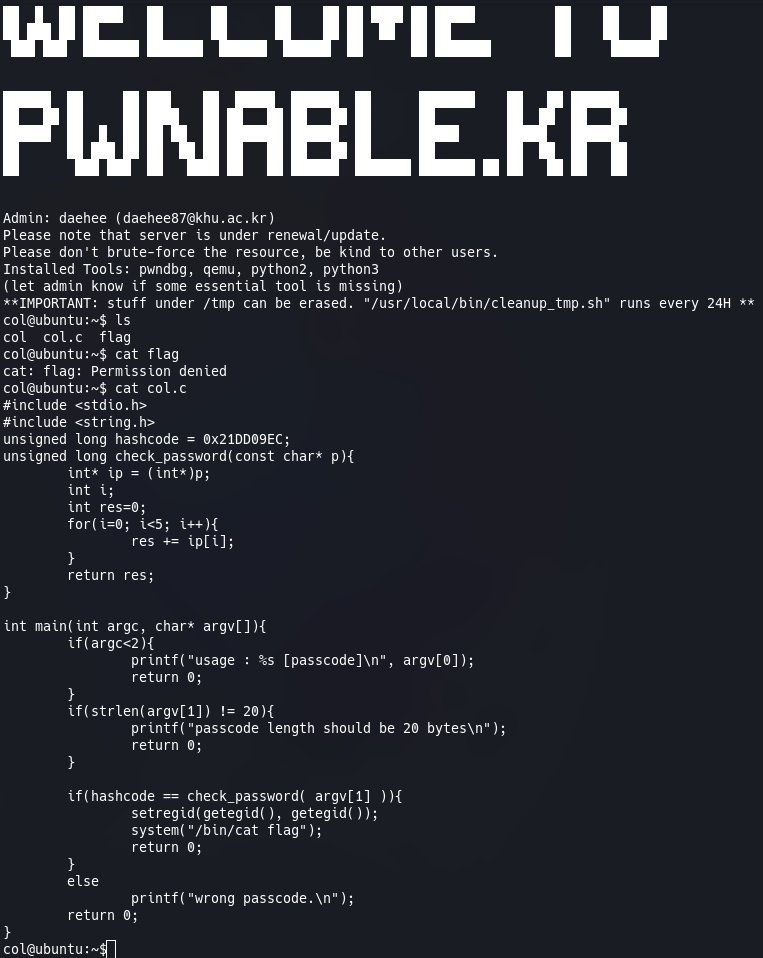
Now lets break down what’s happening in this C code. I’m not going to go over everything line by line, but I’ll point out the important parts and explain them as best as I can.
unsigned long hashcode = 0x21DD09EC;: This is a non-negative long integer which will store larger numbers than a regularint. This is the hashcode that was generated from an input.unsigned long check_password(const char* p): This is a function which will return an unsigned long integer and has an argument of a pointer to a const char (or in C, another way to declare a string). Lets break down what’s going on in this function below.int* ip = (int*)p;: This is an explicit type-cast in C. This is is telling the compiler that the memory atpshould be accessed as if it were an integer in 4 byte blocks. So for example if we supplyaaaabbbbccccddddeeeeas an argument when we run the program this will interpret that data asip[0]=aaaa ip[1]=bbbb ...and so forth. You can read more about pointers and type-casting them here. For more on type-casting (explicit and implicit) you can find that hereint res=0;: Declare res as an integer and set it to 0.for(i=0; i<5; i++): A for-loop in C. This will repeatedly run this code untiliis equal to 5, so it goes from 0-4.res += ip[i];: This will assignresthe values ofip[i]as discussed above. If the input forpisaaaabbbbccccddddeeeethenip[0]=0x61616161as we said above, which will meanres += 1633771873.
return res;: Return res, the C compiler will implicitly type-cast this to an unsigned long as the function requires.
if(argc<2): This is just an if block to see if we are providing less than 2 arguments when running the executable. If we are, give feedback, and return 0.if(strlen(argv[1]) != 20): If the length of the argument we provide is not 20 characters, provide feedback and return 0.if(hashcode == check_password(argv[1])): If block to check if our provided input when run through thecheck_passwordfunction will return the same hash ashashcode. If it does read theflag.
What We Know
Now that we understand the code and understand MD5 hashes and collisions lets see if we can find the vulnerability with this and get the flag. First let’s run the executable and see what happens. Like before, we can use ./col to run it. Running it returns the feedback of usage : ./col [passcode] which means it requires us to pass an argument when we run the file, okay let’s try ./col abcd. Running that will give us the feedback of passcode length should be 20 bytes. So it’s looking for a longer passcode, lets try ./col abcdefghijklmnopqrst. Running that will return wrong passcode. Okay, so we’ve established what the executable is looking for and how to provide it. So, what do we know?
- We know the hashcode that we need to match which is
0x21DD09ECor568134124in decimal. - We know that there is a function our provided passcode runs through that will loop 5 times.
The Vulnerability And Why It Works
First, lets run gdb and see if our breakdown of the check_password function is correct. We can confirm this with gdb by running gdb --args ./col aaaabbbbccccddddeeee. Lets disassemble the check_password function and set a breakpoint. 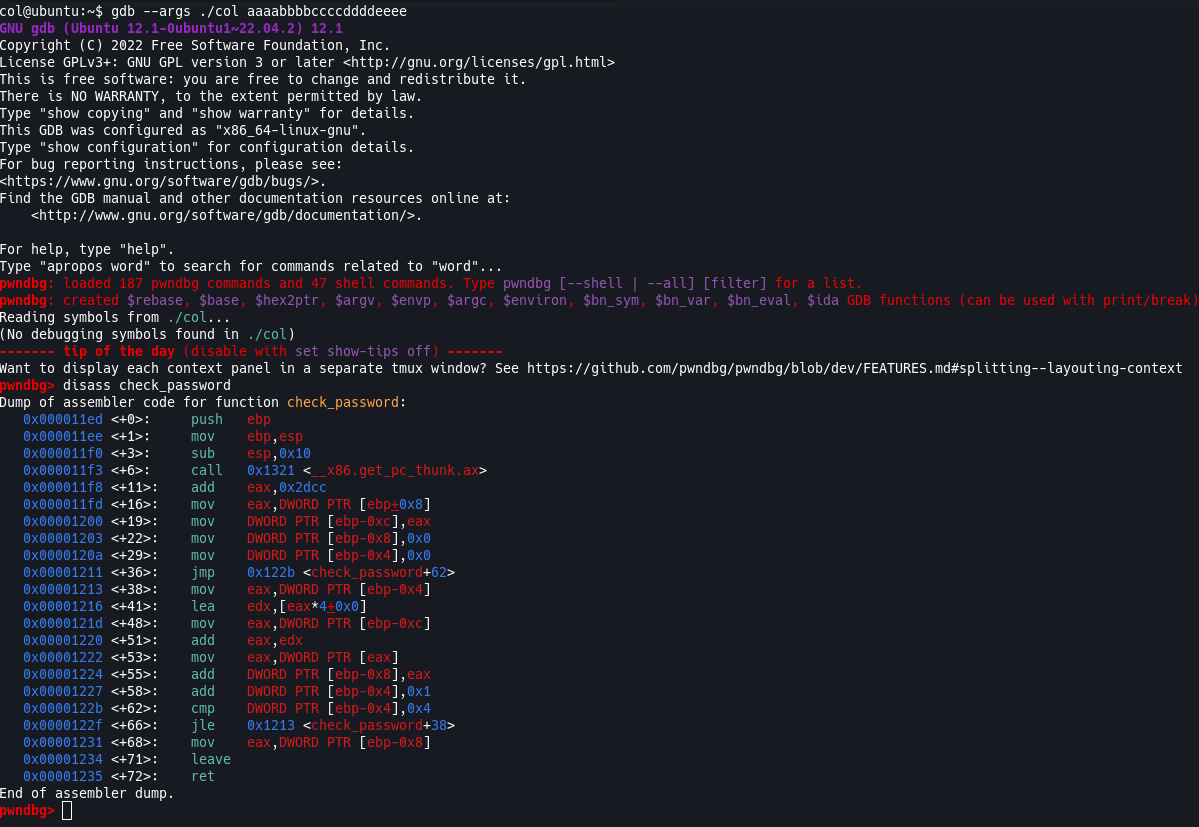
There is a lot of scary stuff here, but we’re looking for the res += ip[i] portion, which I believe is at the instruction add DWORD PTR [ebp-0x8],eax. So what’s going on here?
Tip: This is assembly and is good knowledge to have when doing binary exploitation and reverse engineering.
add: This is just calling the add instruction.DWORD PTR: This stands for Double Word which is just how assembly specifies the size of the operation which is 4 bytes.[ebp-0x8]: EBP stand for Extended Base Pointer and is a 32-bit register which acts as a frame pointer to the current function. This means it’s used to mark the base/start of the function on the stack, which is called the “stack frame”. This means the ESP (Extended Stack Pointer) is free to go do it’s job and change because we can rely on the EBP when we’re executing the current function (which is the check_password function in this case). This means we can use EBP to access local variable or function arguments, which in this case is being done withebp-0x8this means the assembly code is accessing a local variable (resin our case). If it were accessing the function arguments it would be doebp+0x8instead.eax: This is the Extended Accumulator register and is used for arithmetic and logical operations. The instruction before this was reading a 4 byte value from the EAX back into the EAX. Now we’re adding that value into the local variable atebp-0x8which in this case isres.
So lets add a breakpoint there with break *check_password+55 and then call run to run the gdb. 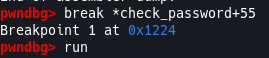
Now if we run p/x $eax we will see 0x61616161 and if we type n and enter a few times until we loop back here we will see 0x62626262. So that means we need 4 4-byte values that equal our original hashcode of 0x21DD09EC. So lets divide 0x21DD09EC by 5. We get a number with a remainder, which in this case we don’t care about because we need 5 numbers if we multiply this number by 4 we can still add another number to it to get 5 numbers to match the loop, so lets grab the number and covert it to hex which is 0x06C5CEC8. Now we need to find the leftovers we can do 0x21DD09EC - (0x06C5CEC8 * 4) and we get 0x06C5CECC in hex. If we do (0x06C5CEC8*4) + 0x06C5CECC we get 0x21DD09EC. So we got the numbers we need now we need to feed them back into our executable but first we need to change them to little-endian.
Note: The reason we’re working with hexidecimals here is because each hexidecimal value is 4 bytes which makes it easy to pass into our executable and it’s also looking for strings that will convert to ints later.
What is Endianness
Endianness is the order in which bytes are arranged in memory. Big-endian stores the most significant byte first and little-endian stores the least significant byte first. This allows data from being misinterpreted when data moves between systems. So if we look at our hashcode of 0x21DD09EC that is already in big-endian because 21 is the largest weighted contribution and the little-endian representation is 0xEC09DD21. This is the simplest example, to learn more I would read the following page here. To finish this off, to figure out whether an executable uses little-endian or big-endian you can run the file command on Linux. So for our example we’d do file col and you’ll see LSB (least significant byte) or MSB (most significant byte), in our case you should see LSB. 
Collide The Hashes
So, we have the two hexidecimals 0x06C5CEC8 and 0x06C5CECC which equal 0x21DD09EC when added. We know our executable is in little-endian (LSB). So to pass this I am going to use python. You can write a python script that will do it all, which I will also have below. So first lets change our hexidecimals to little-endian which will be: 0x06C5CEC8 = 0xC8CEC506 0x06C5CECC = 0xCCCEC506
So now we can pass that into our executable as so ./col "`python2 -c "print '\xc8\xce\xc5\x06'*4+'\xcc\xce\xc5\x06'"`" and you should get the flag! I’ve removed the flag from the screenshot below, so go get that flag and submit it on pwnable! 
Python Script
Here is a python script that will do all the work for you. I’ve commented it so it should be easy to follow. You can find it on my github here 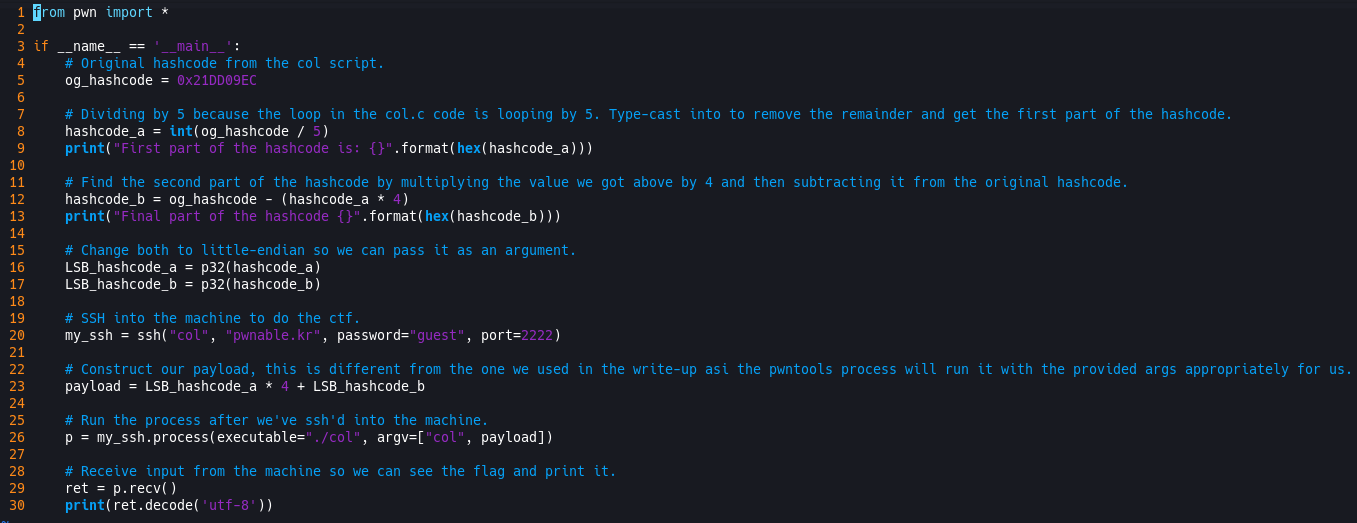
Secure This
Again, I know the purpose of this challenge is to teach us and to purposely be able to do hash collision, but if you’re using cryptography in your code be sure to use SHA-256 or SHA-3 to make it harder to crack, use longer hashes, or salt your hashes so attackers aren’t able to use precomputed tables to crack it!